Saferpay Fields
VERY IMPORTANT: Before you start integrating this flow, make sure, you have read the the Introduction and Licenses and Interfaces chapters. They contain general and vital information, not only about the JSON-API, but also for you, the merchant!
The Saferpay Fields grant you the flexibility of your own HTML-form, whilst being 100% PCI SAQ-A compliant.
The main idea is, to split the classic card entry form into its components, namely the inputs for the PAN, CVC, Expiration and Holder Name. These fields will be hosted on Saferpay-side, making sure, that the data is captured by a fully PCI-certified system, while offering you a level of flexibility and the possibilities, similar to using your own form.
This chapter will cover the integration and preperations necessary, to work with the Saferpay Fields.
Supported Payment Methods
- Visa/VPay
- Mastercard
- Maestro
- American Express
- Bancontact
- Diners Club
- JCB
- Bonus Card
- MyOne
Basic Flow
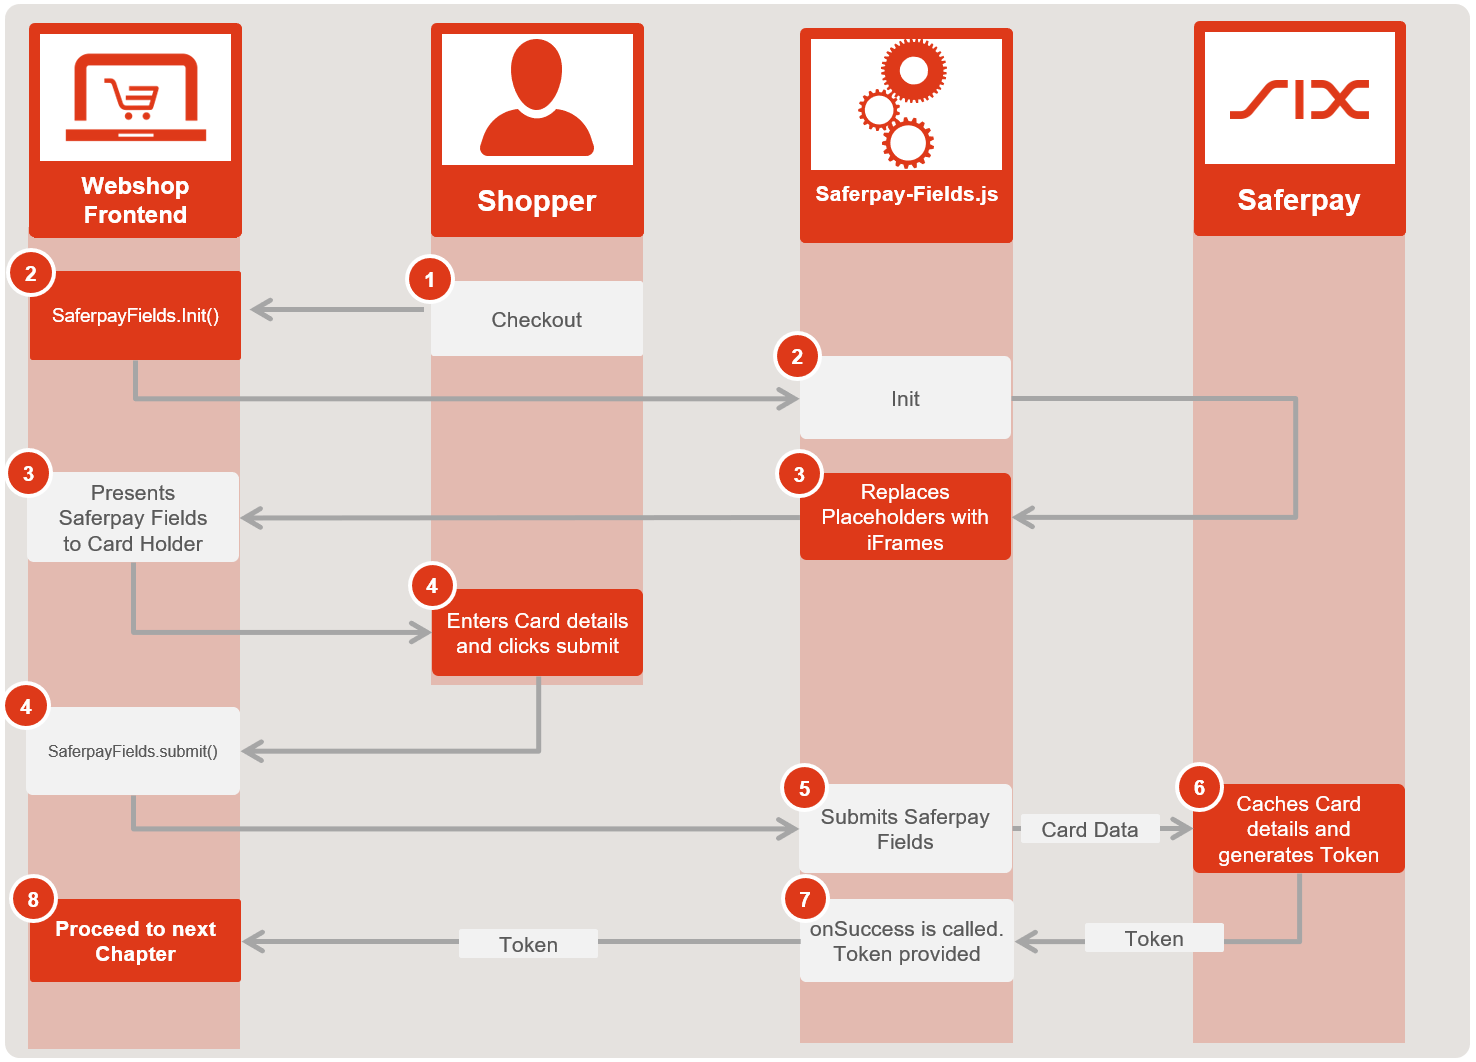
This is the basic Saferpay Fields flow.

- The card holder navigates to the checkout
- The shop frontend calls SaferpayFields.Init() (See Integration and Initialization > Hosted Fields Initialization) and the Saferpay Fields Javascript library initializes the iFrames.
- Once initialized, the library will replace the placeholders with the correct iFrame inputs, which then are presented to the card holder.
- The card holder enters his card details and clicks "Submit", on which the Webshop executes the SaferpayFields.submit() function.
- The Saferpay Fields Javascript library then submits the iFrames, which sends the card details towards Saferpay.
- Saferpay caches the card details for a maximum of 20 minutes and generates a token, which is then used to reference said means of payment.
- The token is forwarded and the SaferpayFields.submit(); onSuccess callback is called, so the token may be captured and processed further.
- The token then has to be forwarded to serverside. How you do that, is up to you. Methods like for example a redirect or AJAX are possible. Once on serverside, the token is then used to initialize the transaction itself, following the normal Transaction Interface flow. Please refer to that chapter on further information, about how to submit the token through the JSON-API and execute the transaction itself.
Preparation
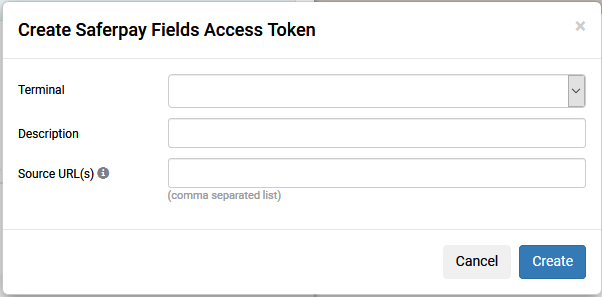
Before you can start integrating the Saferpay Fields, you need to create an Access Token. To do so, you need to log into the Saferpay Backoffice. Navigate to Settings > Saferpay Fields Access Tokens. There, please click on Create Saferpay Fields Access Token. The following window will pop-up:

Very Important: Saferpay will indeed validate the used Source-URL and the used TerminalId! It is enough to just enter the base-url, of your shop here. If you use multiple terminals, you have to generate more Access Tokens for each terminal. HTTPS IS MANDATORY and will be checked!
Should you have misconfigured the access-token, the .init({options}) - onError callback will be triggered, returning an "Access forbidden!" message. Make sure, you've set the correct URL, for the system you are currently running on, especially during integration and then later deployment!
Tip: On the Test-Environment you can use a self-signed SSL-certificate, if you wish. This is helpful, if you are coding and testing on a small, local machine, instead of a server. Furthermore, as a Source-URL, you can enter you Computer-/Host-name. Example https://hostname. This works with local PCs, that do not have a public domain attached to them!
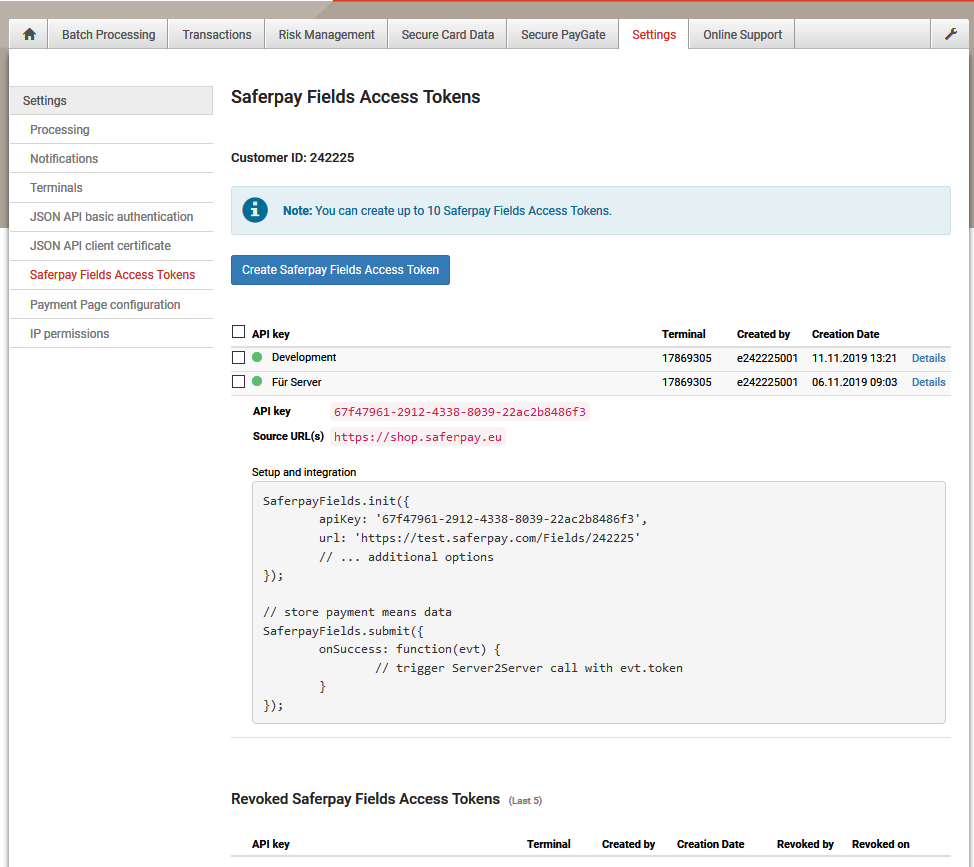
Once created, you will be presented with a basic integration-example:

Very Important: Once you move from the Test-Environment to the Live-Environment, you need to create a new Access Token on your live account!
Integration and Initialization
After you have created your API-Token, you can start integrating the Saferpay Fields into your site.
Include the Saferpay Fields JavaScript library into your site
<script src="https://test.saferpay.com/Fields/lib/1/saferpay-fields.js"></script> <!-- For Test-Environment-->
<!-- OR -->
<script src="https://www.saferpay.com/Fields/lib/1/saferpay-fields.js"></script> <!-- For Live-Environment-->
Define, where Saferpay should insert the Hosted Fields
    <div class="row">
	<div class="col-md-12 field">
	    <div id="fields-holder-name"></div>
	</div>
    </div>
    <div class="row">
	<div class="col-md-12 field">
	    <div id="fields-card-number"></div>
	</div>
    </div>
    <div class="row">
	<div class="col-md-7 field">
	    <div id="fields-expiration"></div>
	</div>
	<div class="col-md-5 field">
	    <div id="fields-cvc"></div>
	</div>
    </div>
Tip: The Holder Name is generally optional. If you don't want to capture it, leave it out! However, once the field has beeen initialized (see further below), it must be filled in!
| Input-Field | id-Value |
|---|---|
| Card Holder Name | fields-holder-name |
| Card Number | fields-card-number |
| CVC | fields-cvc |
| Expiration | fields-expiration |
Important: The placeholder must have a height > 0, or the iframe will inherit this height!
Note: The CVC is always mandatory, except on cards, that do not have a CVC! In these cases, Saferpay will deactivate the field!
Saferpay Fields Initialization
SaferpayFields.init({
	// access token
	accessToken: '[YOUR Access Token]',
	// api url
	url: 'https://test.saferpay.com/Fields/[YOUR CUSTOMERID]',
	style: {
	    '.form-control': 'border: none; border-bottom: solid 1px #ccc; border-radius: unset;'
	},
	paymentMethods: ["visa", "mastercard"],
	onSuccess: function() {
	    //Callback on successful Init
	},
	onError: function(evt) {
	    //Callback on unsuccessful Init
	},
	placeholders: {
		//Custom Text for Input placeholders
	    holdername: 'Card holder',
	    cardnumber: '0000 0000 0000 0000',
	    expiration: 'MM/YY',
	    cvc: 'CVC'
	},
	onBlur: function (evt) {
	    //Callback on blur (Card Holder leaves field)
	},
	onValidated: function(evt) {
	    //Callback similar to on blur (Card Holder leaves field), but explicitly delivers validation data
	},
	onFocus: function (evt) {
	    //Callback on focus (Card Holder clicks into field)
	}
});

// submit(); sends the entered hosted fields data to Saferpay.
SaferpayFields.submit({
	onSuccess: function(evt) {
	    //Callback on successful Submit
	},
	onError: function(evt) {
	    //Callback on unsuccessful Submit
	}
});
SaferpayFields - Class functions
.version()
Returns a string containing the current library-version.
.init({options})
Initializes the Saferpay Fields and replaces the placeholders, as defined before.
Available options
accessToken string : Contains the Access Token, you have defined inside the Saferpay Backoffice earlier.
url string : Contains the API-Url, to define, where to post the data and initialize the Saferpay Fields.
// Test Environment
	url: 'https://test.saferpay.com/Fields/[YOUR CUSTOMERID]',
// Live Environment
	url: 'https://www.saferpay.com/Fields/[YOUR CUSTOMERID]',
- onBlur eventCallback : Callback function, that is executed, should the customer leave the field. The event returns a Callback message.
- onValidated eventCallback : Callback function, that is executed, should the customer leave the field. The event returns a Callback message, also containing field validation-data.
- onFocus eventCallback : Callback function, that is executed, should the customer enter the field. The event returns a Callback message.
- onSuccess eventCallback : Callback function, that is executed, every time, the Saferpay Fields have been loaded successfully.
- onError eventCallback : Callback function, that is executed, every time, the initialization of the Saferpay Fields has not been successful. The event returns an Error Callback Message.
- style Object : Object, that defines CSS rules, to be applied to all elements. Example:
style: {
	'.form-control': 'border: none; border-bottom: solid 1px #ccc; border-radius: unset;'
}
- paymentMethods String[] : A String-Array, containing a list of brands to be accepted! Currently accepted brands/values: mastercard, maestro, visa, jcb, diners, bancontact, amex, bonus, myone
- cssUrl String : Url to an external CSS, to be applied to all elements.
- placeholders Object : Object, that contains custom placeholder text, to be applied to the inputs. Example:
placeholders: {
    //Custom Text for Input placeholders
    holdername: 'Card holder',
    cardnumber: '0000 0000 0000 0000',
    expiration: 'MM/YY',
    cvc: 'CVC'
},
.submit({options})
Submits the Saferpay Fields.
Available options
onSuccess eventCallback : Callback function, that is executed, if the Saferpay Fields have been submitted successfully. The event returns a Submit Success Callback Message.
onError eventCallback : Callback function, that is executed, if the Saferpay Fields have not been successfully submitted. The event returns an Error Callback Message.
Callback Messages
Saferpay returns certain data to the application, in case of certain eventCallbacks.
Callback Message Object : Callback message on normal event, containing the following data:
| Parameter | Type | Description |
|---|---|---|
| event | String | Name of the event, that occured. |
| fieldType | String | Type of the field affected. |
| id | String | Id of the field affected. |
| isValid | Boolean | Validity of the field affected. (onValidated callback only!) |
| reason | String |
Reason, why a field is not valid! The following reasons can be returned:
|
Error Callback Message Object : Callback message on error event, containing the following data:
| Parameter | Type | Description |
|---|---|---|
| message | String | A human-readable explanation specific to this occurrence of the problem. |
Submit Success Callback Message Object :
Callback message on a successful submit, containing the following data:
| Parameter | Type | Description |
|---|---|---|
| token | String | The Saferpay Fields Token, later to be referenced by Transaction Initialize, to execute the payment itself. |
Browser Support
Saferpay Fields are supported by the following Browsers:
- Chrome latest
- Firefox latest
- Internet Explorer latest
- Microsoft Edge latest
- Safari latest
Examples
Here you can see some examples of how the Saferpay Fields may be integrated. Feel free to use this code, if you have trouble integrating.
Note: If you want to test Saferpay Fields, you can edit all examples in JSFiddle. Please click on the link on the upper right side of the examples: Edit in JSFiddle
Init Sample
Sample 1
Sample 2
Further steps
It is important to understand, that the Saferpay Fields are just a way to capture the card details. Now, you have to decide, what to do, with this information. You have two options now:
Execute a transaction. If you want to use the captured card data for a normal transaction, then you have to refer to the Transaction Interface Process. By simply submitting the Fields Token via this API-Method, you can generate an API Token to trigger an Authorization and a RedirectUrl, for performing other steps, like DCC, or 3D Secure.
Save the card. If you want to just save the card for now, you can do that via the Saferpay Secure Alias Store via standalone registration. This allows you to obtain a card alias, to perform other actions, like recurring payments, or just enable your customers to save new payment means inside their shop account, for further use. The choice is yours.
Once the onSuccess event is called, you need to forward the Saferpay Fields token to your server-backend, in order to initialize the next step (see above) and also gather the RedirectUrl, to perform things like 3D Secure and/or DCC. How you move the token to the backend is completely up to you. You can provide the onSuccess event with an AJAX-method to execute the initialization in the background on a successful submit and forward the RedirectUrl to the fronend for a redirect this way, which you then can open in an iframe, Lightbox, or as a full redirect. However a redirect via GET, or POST, towards your initialize-script, is also an option, of course. Refer to the above mentioned chapters, to learn, how to initialize a transaction, or just save a card, using a Saferpay Fields token.
Important: This process has to be finished within 20 minutes, after the submission of the card details. Saferpay will discard the card details afterwards and the Saferpay Fields token becomes invalid!