Recurring Payments
Recurring payments are transactions processed on a regular basis under a pre-authorized agreement. They are particularly interesting for subscription or instalment business models. This chapter describes the main concept on how the perform recurring payments.
Very Important: Please also consider the PSD2 chapter, when executing recurring payments!
NOTE: Before you start, you have to consider the following: Each transaction has to be triggered by you your system. Please see Automating the Recurring Payments further down in this chapter!
- Transaction Referenced Method - AuthorizeReferenced Function with the TransactionId of the initial transaction
Requirements:
- a Saferpay Business License
- a valid login access with a username and password for the Saferpay Backoffice.
- one active Saferpay ecommerce terminal via which payment can be carried out and the associated
- Saferpay terminal number (TerminalId parameter) and Saferpay customer number (CustomerId parameter).
- valid acceptance agreement for credit cards or other payment methods
Supported Payment Methods:
Recurring payments are supported by the following payment means:
- American Express
- Postcard (SCD method only)
- Bonus Card
- Diners Club
- Discover
- JCB
- Twint (SCD method only)
- Maestro International (SCD method only)
- MasterCard
- Myone
- Sepa Direct Debit
- Visa
- VPAY
Recurring Payments with the Referenced Transactions Method
With this method, the initial transaction is performed with either the PaymentPage Interface or with the Transaction Interface leading the cardholder through a normal ecommerce payment process, including entering the CVC and 3DSecure authentication. The first transaction is flagged as initial transaction. The Transaction ID of the initial transaction can then be used for referenced/recurring transactions.
1. Initial Transaction:
The Initial Transaction can be performed with the PaymentPage Interface or via the Transaction Interface, using Transaction Initialize and Transaction Authorize .
This transaction basically captures the credit card details and sets a flag, to mark it as an initial transaction that can be used as a reference for recurring transactions.
To define a transaction as the initial transaction, you need to set a special flag with either the PaymentPage Initialize Request or Transaction Initialize Request by defining the Container
Recurring": {
      "Initial": true
Here is an example of a PaymentPage Request with the Container Recurring:
Request URL
POST /Payment/v1/PaymentPage/Initialize
{
"RequestHeader": {
   "SpecVersion": "[CURRENT SPEC-VERSION]",
   "CustomerId": "[your customer id]",
   "RequestId": "[unique request id]",
   "RetryIndicator": 0
 },
 "TerminalId": "[your terminal id]",
 "Payment": {
   "Amount": {
     "Value": "100",
     "CurrencyCode": "CHF"
   },
   "Recurring": {
     "Initial": true
   }
 },
 "Payer": {
   "LanguageCode": "en"
 },
 "ReturnUrls": {
   "Success": "[your shop payment success url]",
   "Fail": "[your shop payment fail url]"
 },
 "Styling": {
   "CssUrl": "[your shop css url]"
 }
}
Important: Due to laws, defined within PSD2, Saferpay will force a 3DS Challenge, if a transaction is labeled as recurring.initial = true!
2. Validating the transaction
Depending on the Interface used to initialize the transaction, you can validate the payment and assess transaction based information with either:
- PaymentPage Assert or
- Transaction Authorize function.
Both request will provide you with information about the Transaction including the 3D Secure response:
Here is an example of a PaymentPage Assert Response:
{
  "ResponseHeader": {
    "SpecVersion": "[CURRENT SPEC-VERSION]",
    "RequestId": "[your request id]"
  },
  "Transaction": {
    "Type": "PAYMENT",
    "Status": "AUTHORIZED",
    "Id": "MUOGAWA9pKr6rAv5dUKIbAjrCGYA",
    "Date": "2017-06-18T09:19:27.078Z",
    "Amount": {
      "Value": "100",
      "CurrencyCode": "CHF"
    },
    "AcquirerName": "AcquirerName",
    "AcquirerReference": "Reference"
  },
  "PaymentMeans": {
    "Brand": {
      "PaymentMethod": "SAFERPAYTEST",
      "Name": "SaferpayTestCard"
    },
    "DisplayText": "9123 45xx xxxx 1234",
    "Card": {
      "MaskedNumber": "912345xxxxxx1234",
      "ExpYear": 2021,
      "ExpMonth": 9,
      "HolderName": "Max Mustermann",
      "CountryCode": "CH"
    }
  },
  "Payer": {
    "IpAddress": "1.2.3.4",
    "IpLocation": "CH"
  },
  "ThreeDs": {
    "Authenticated": true,
    "LiabilityShift": true,
    "Xid": "ARkvCgk5Y1t/BDFFXkUPGX9DUgs=",
    "VerificationValue": "AAABBIIFmAAAAAAAAAAAAAAAAAA="
  }
}
You must save the TransactionId (Container: "Transaction">"ID"), returned in the Paymentpage Assert or Transaction Authorize response as this value will be used to reference recurring payments.
NOTE:We recommend only to proceed, if the parameter “Authenticated” is true. This value indicates that the card holder has performed a full successful authentication (3D Secure process) at his bank. This option provides the highest level of security against fraud. Please take notice that some banks will skip the 3Dsecure process if they consider the transaction to have a low risk thus will still grant Liabilityshift although the cardholder did not have to authenticate him or herself. In that case the values returned for ”LiabilityShift” will be “true” and “Authenticated” will be “false”. You should assess which level of security suits best to your business model and target group before deciding how to handle these two parameters.
3. Recurring Transaction:
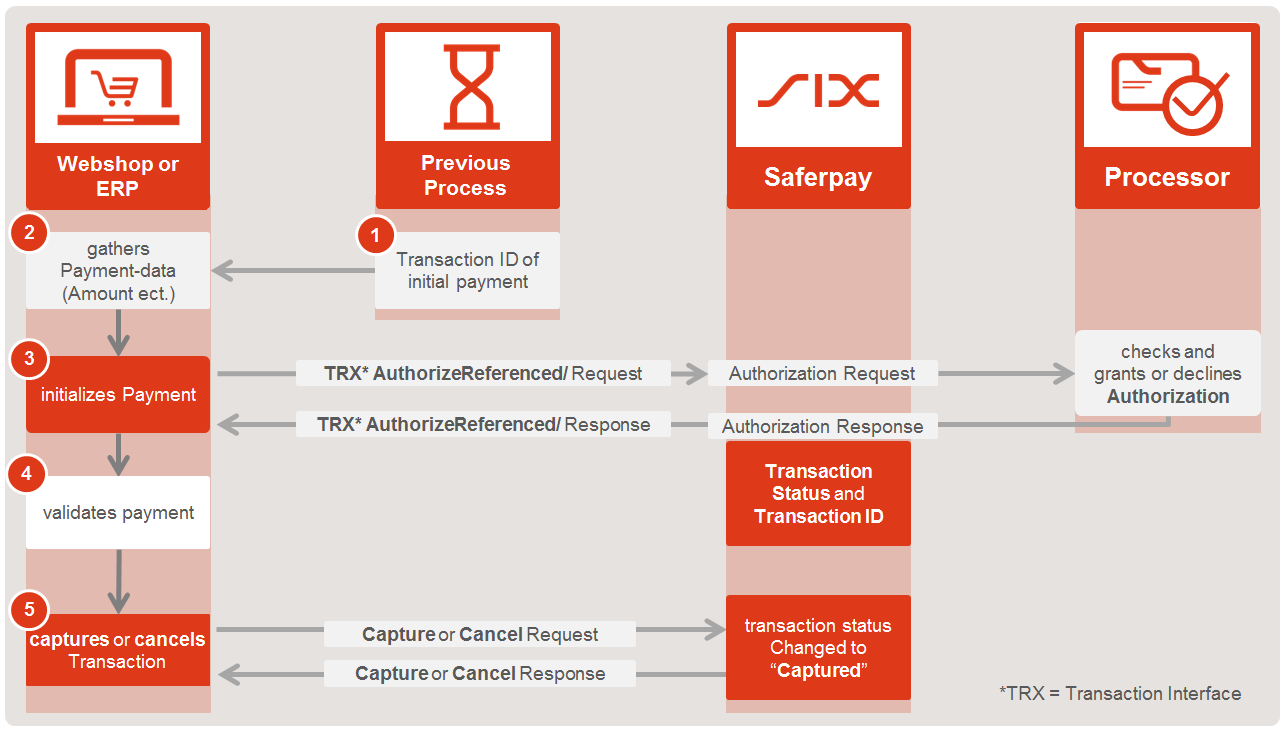
The next step is to perform the actual recurring transaction(s). The API-Function that is required is Authorize Referenced. You have to simply submit the TransactionId from your initial transaction (discussed in step 2) to perform the recurring transaction(s)
Flowchart
- Gather the TransactionId from the previous, initial, transaction
- Aquire the necessary payment-data e.g. Amount, Currency, OrderId etc.
- Initialize and Execute Payment with Transaction Authorize Referenced
- You will get the authorization-response right away
- Validate the request response
- Depending on the outcome of step 4 you may
- Transaction is finished!
Here is an example of a Authorize Referenced Request:
Request URL
POST /Payment/v1/Transaction/AuthorizeReferenced
{
  "RequestHeader": {
    "SpecVersion": "[CURRENT SPEC-VERSION]",
    "CustomerId": "[your customer id]",
    "RequestId": "[unique request id]",
    "RetryIndicator": 0
  },
  "TerminalId": "[your terminal id]",
  "Payment": {
    "Amount": {
      "Value": "100",
      "CurrencyCode": "CHF"
    },
    "Description": "Test123",
    "PayerNote": "Order123_Testshop"
  },
  "TransactionReference": {
    "TransactionId": "MUOGAWA9pKr6rAv5dUKIbAjrCGYA"
  }
}
NOTE: The Amount is a mandatory value which can vary from the Amount of the initial transaction. A change of amount has to be communicated with the card holder and you must re-do this process, to start the recurring-chain over again!
IMPORTANT: Each Transaction with the Status **Authorized** has to be captured to initiate the actual money transfer.
Recurring Payments using an alias
A second method is to use the Saferpay Secure Alias Store in conjunction with the AuthorizeDirect Request with previously registered Aliases.
1. Obtaining the Alias
The alias can be obtained in multiple ways, using the Saferpay Secure Card Data store. All of those options are described over here. By using the Payment Page or Transaction Interface, it is possible to do an initial transaction, to validate the card (e.g. through 3D Secure), similar to the referenced transaction-process above! The initial payment, unlike with a referenced authorization, can then be discarded, once the alias has been obtained, using Transaction Cancel. This way the card holder doesn't get charged for the dummy-amount!
Important: Amount values that undercut a certain value, can cause problems during the 3D Secure-process, thus we recommend a value of 500 (5,00 €). As mentioned above, this transaction can be discarded. It is only, to prevend the mentioned issues with 3D Secure!
2. Recurring Transaction
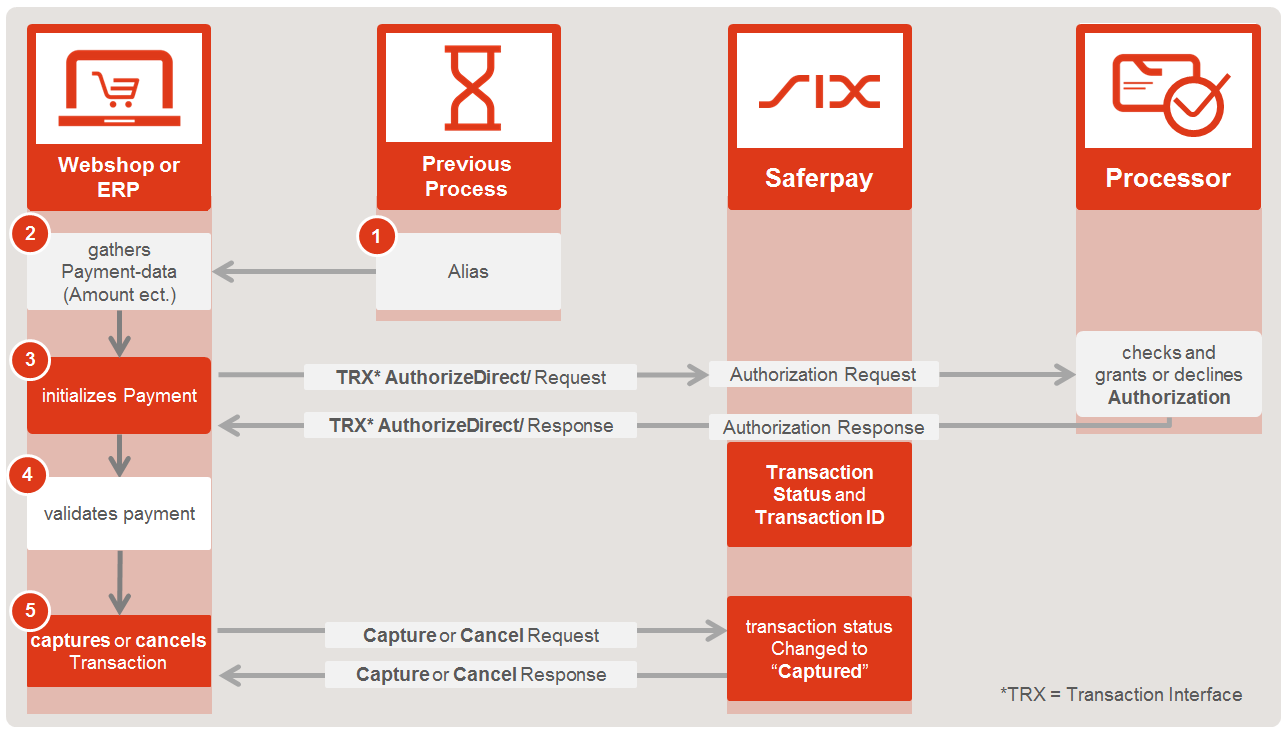
Once tha alias has been obtained, you can execute the subsequent transactions using AuthorizeDirect Request. The alias has to be filled into the PaymentMeans => Alias container.
Important: Please DO NOT save the CVC value inside your database and submit it yourself, unless you are certified to do so.
Flowchart
- Gather the AliasId from the previous, initial, transaction
- Aquire the necessary payment-data e.g. Amount, Currency, OrderId etc.
- Initialize and Execute Payment with Transaction Authorize Direct
- You will get the authorization-response right away
- Validate the request response
- Depending on the outcome of step 4 you may
- Transaction is finished!
Important: Each Transaction with the Status Authorized has to be captured to initiate the actual transfer of money.
Automating the Recurring Payments
Automated recurring payments have to be triggered by the merchant's system. There are multiple ways to setup up the automated triggering of payments. The easiest way is to setup a Cronjob (Linux) or a Task (Windows). With cronjobs you can schedule a command or script on your server to run automatically at a specified time and date (e.g. every minute, every 15 Minutes, every hour, or every day at 10pm or even every Sunday.)
The cronjob can be linked with a script (e.g. PHP, or a Bash script) that will be executed, every time the cronjob is triggered to automatically perform transactions. You should decide when and how often the payments have to be triggered depending on your business model and the prearranged scheduling of payments.
NOTE: Please note that each transaction has to be finalized by calling the capture function including the automated recurring transactions.

