Glossary
| Term | Explanation | Where to find it |
|---|---|---|
| CustomerId | This is your primary account-number! Everything else about your Account is directly linked to this ID e.g.: Terminals, Card Aliases, Backoffice-Accounts, JSON-API Credentials and more! |
The CustomerId is part of many other things. For example your Backoffice userId: e123456001 . It also is contained within your JSON-API userId: API_123456_12345678. additionally, it is displayed inside the Backoffice under Settings > JSON API Basic Authentication and Settings > JSON API Client Certificate. |
| TerminalId | A terminal always belongs to a Customerid and thus one account. The terminal contains certain payment methods, the connected contracts to those payment methods e.g. your acquiring contracts for credit cards, the supported currencies and other settings, like 3D Secure. Each terminal can only have one processor for a given payment method. If you want to process the same payment method over different processors, you need to have two different terminals. Each Saferpay account (CustomerId) can have multiple terminals beneath it. This could also be helpful, if you want to operate multiple shops (e.g. for different countries, or different sets of good alltogether) under one Saferpay account (CustomerId). |
You can find each terminal for your given account inside the Saferpay Backoffice under Settings > Terminals |
| E Commerce Terminal | This is your standard terminal for transactions. It should be the standard terminal, if you are using Payment Page Initialize or Transaction initialize for secure E Commerce transactions (hence the name). You can have one, or more (see TerminalId), if you so desire, e.g. for multiple webshops. This type of terminal usually has the format 17xxxxxx. |
You can differentiate between all your terminal types inside the Saferpay Backoffice under Settings > Terminals: 
|
| Secure PayGate (Terminal) | This terminal is the little brother of the E Commerce terminal. While also capable of processing secure E Commerce transactions, it is meant to be used within the Secure PayGate, a Saferpay product, that enables you to send payment-links and offers within an e-mail, through the Saferpay Backoffice. For your normal webshop, you should use your E Commerce terminal. Similar to its bigger brother, it also has the format 17xxxxxx. |
You can differentiate between all your terminal types inside the Saferpay Backoffice under Settings > Terminals: 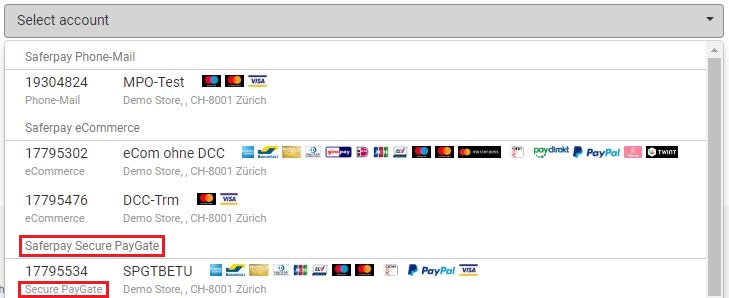
|
| Mail Phone Order (MOTO) Terminal | This terminal is used in cases, where the card holder itself is not present. For example, like the name suggests, Mail Phone Order transactions within the Saferpay Backoffice. The background is, that the card holder is unable to perform a 3D Secure Authentication, or enter his/her CVC. Please note, that these security-measures also do not apply with transactions made over this type of terminal! MOTO terminals usually have the following format: 19xxxxxx |
You can differentiate between all your terminal types inside the Saferpay Backoffice under Settings > Terminals: 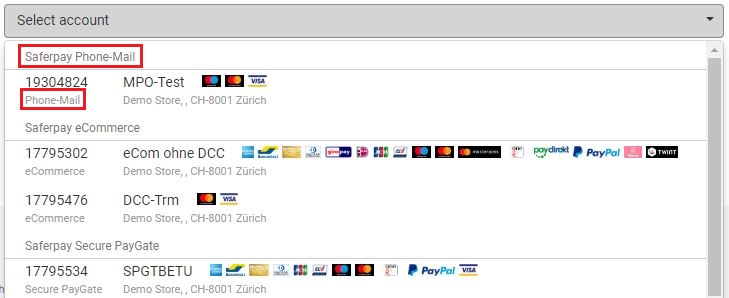
|
| Saferpay Backoffice | This is the Saferpay Web Backend, that contains information about your transactions, settings for your account, API-credentials and more. |
The Live Backoffice can be found over here and the Test Backoffice can be found over here. |
| Backoffice Login | This is your login to the Saferpay Backoffice and it is directly connected to your CustomerId and thus your Saferpay account. In fact it incorporates the CustomerId. A Backoffice login may look like this: e123456001. The first being the type of the login, e for E Commerce, t for technician for example, the second being your CustomerId and the last the overall number of the login for said account. |
The login will only be sent towards the login owner, that had be requested durign the signing of the Saferpay contract. New logins may be requested, but only through the contract holder of the Saferpay account him/herself. |
| API Credentials (API User/API Password) | These are your API authentication credentials. They're needed so your shop may authenticate itself which each request, towards our payment gateway. DO NOT CONFUSE THEM WITH YOUR BACKOFFICE LOGIN AND PASSWORD! Those are two different things. Each credential pair is linked directly to one CustomerId and only that Id. If you try to authenticate a different CustomerId, with credentials, that aren't connected to said Id, the request will fail. You can easily find out, if a CustomerId and API-user are connected together, by checking the userId itself. The customerId is part of said id: API_123456_12345678 |
On the test-environment, you'll get these credentials automatically, with your registration mail. However on the live-system, you need to create them inside the Saferpay Backoffice under Settings > JSON API Basic Authentication. There you'll also find a list with previously created userIds (Also applies to the automatically created test-credentials!). However, please note, that we only save the password encrypted! There is no way to recover it, should you lose it, so keep it somewhere safe, like a password-safe! You can however always create new credentials. Up to 10 are supported per Saferpay account. After that, you need to delete previously created ones. |
| Card Alias | This value is part of the Saferpay Secure Card Data store, which savely encrypts and stores card data in a PCI compliant manner. Most merchants do not have the necessary PCI certification to handle, in this case save, card details directly. Thusly Saferpay provides a service, that does exactly that. In return the merchant-system gets a card alias, which references the card details. This way the merchant can process card details, without actually knowing them. |
The Alias is only returned through the API, when using Secure Card Data, or it has been set by the merchant in advance. Obtaining the alias in a different manner is not possible! |
| Token | First and foremost, one important thing: Do not confuse this with tokenization. Tokenization is essentially, what Secure Card Data is for. However the token is not meant to reference card details. That is, what the alias (See Card Alias) is meant for. It is important to seperate these two values, in order to avoid confusion. The Token is a value returned by the Saferpay API, to enable further actions on a transaction, not a card! So it actually references a specific transaction -and thus indirectly the card details- and by submitting it via the API, Saferpay knows what transaction you want to do an action with. For example with the Payment Page Assert, Saferpay knows, that you want the transaction details for the transaction behind said token! |
The token is only returned via the API. Either through Payment Page Initialize, Transaction Initialize, or Alias Insert. |
| TransactionId | Each Saferpay transaction gets assigned a unique transactionId. This Id can be used to search for said transaction inside the Saferpay Backoffice, do captures and more. It can also help the Saferpay Support, if you need help with a certain transaction. If available, always submit the transactionId, this way the support can easily find the transaction and help you! |
The transactionId is returned via the API. Either through Payment Page Assert, Transaction Authorize, Transaction AuthorizeDirect, or Transaction AuthorizeReferenced, inside Transaction.Id. Furthermore, you can also find it inside the Saferpay Backoffice, when checking the details for a given transaction. |
| CaptureId | With the introduction of Partial Captures, it became possible to split one transaction into multiple parts, allowing to gather multiple parts of the transaction amount and even transfer it to different bank accounts! However that also made it necessary to give each part its own Id, in order to do Refunds on an individual part! In order to not confuse it with the transactionId, the captureId has the suffix "_c"! |
The captureId is returned via the API. Either through Transaction Capture, or Transaction MultipartCapture. |
| OrderId | This Id is your identifier, for a given order. It has to be created by your system and then be submitted through the API inside the Payment.OrderId parameter. While not mandatory (Note, that this may be manddatory for certain 3rd party processors!), we highly recommend using it. This Id will be passed through, all the way up to the processor. It will show up inside the Saferpay Backoffice as reference number, which enables you, to search for a transaction with said orderId. It will also show up on your reconciliation files, you get from your processor and it will show up on the card holders bank statement. Note, that this depends on the card holders bank. Some do not support it, even though the OrderId is set! Also, should you use PayerNote (See PayerNote), this will be used instead of the OrderId, to show up on the card holders bank statement, if supported by his bank. The OrderId however will still be used for your reconciliation files. |
This has to be set by the merchants system. Furthermore, you can also find it inside the Saferpay Backoffice, when checking the details for a given transaction, as reference number. |
| PayerNote | Sometimes the merchant wants to seperate the Orderid from the text, that is displayed on the card holders bank statement. This is, what PayerNote is used for. If filled, PayerNote will be used, instead of the OrderId, for the card holder. Note, that your reconciliation-files will still use the orderid! Furthermore, some banks may not support this feature and will instead display a static text. |
This has to be set by the merchants system. Important Note: Your contract needs to be set up for the usage of the "dynamic descriptor" in order for PayerNote to take effect!. Please contact your contractual manager for more details! |